The connection between Shape Software and Arive can be set up with a Zapier Premium account to allow loan files to be sent from Arive to Shape and update the status accordingly in Shape from Arive.
Integration Requirements
Before getting started, please ensure that you have the below requirements for the connection:
A Shape Software Account with Admin access
A Zapier Premium Account
An invitation from Arive to utilize their app in Zapier
Integration Capabilities
Receive a loan file from Arive which creates a record in Shape
Receive status updates from Arive to Shape
How to Integrate Arive to Shape
1.
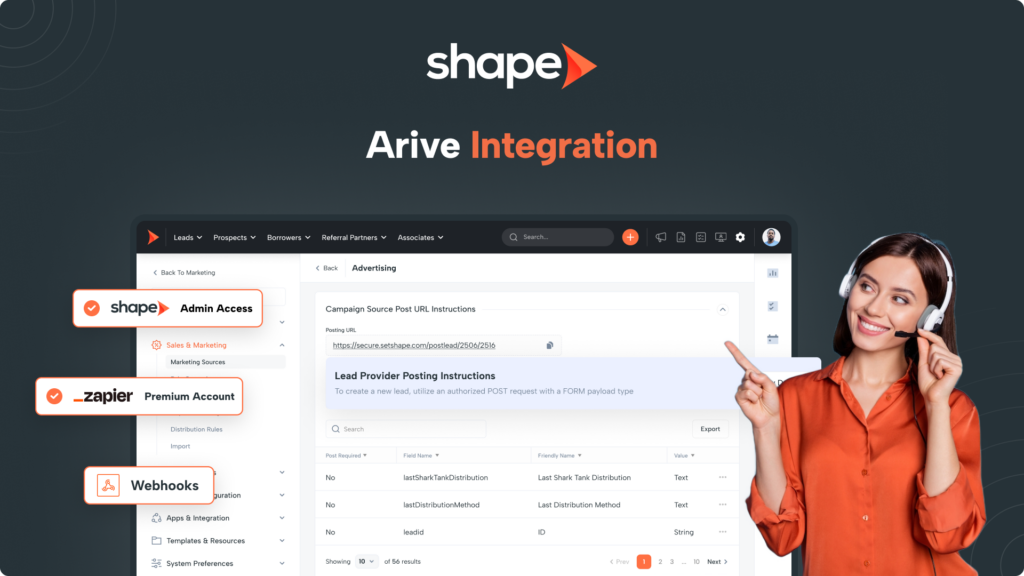
Create a Marketing Source in Shape for Arive
Navigate to Settings > Marketing Sources linked below to create a source in your system titled “Arive” to label incoming loans with the correct source
Each source you create in Shape will be given a unique posting URL as a secure endpoint for lead data to land in Shape. Copy this URL as it will be needed in Zapier.
3.
Export the Field Mappings from the Arive source in Shape
Below where you copied the posting URL, you will find the field mappings for the Shape fields! We will need these as we will be mapping the Arive data fields, to the Shape field names for the integration.
Receiving New Loans in Shape Automatically From Arive
Note: The Arive integration is currently invite only and you must reach out to Arive to receive the invitation to connect Arive to Zapier if not done already.
1.
In Zapier, create a new Zap named "Arive to Shape"
This will be our Zap to receive loans from Arive. At the top of the event is the “Trigger Event”, you will set this to “Arive API” where you may be prompted to sign into Arive to give permissions for the connection.
2.
Set the Event dropdown to "New Loan in Arive"
This will send the new Loan to Shape once the Zap is finished. Once selected, move on to test the trigger.
3.
Test the trigger to pull the data fields from Arive
You will need to test the trigger to pull the data that Arive is sending. These are the data points that we will be mapping to the Shape fields.
If you do not see anything when testing the trigger, please reach out to Arive Support to troubleshoot.
4.
Set the Action Step to "Webhooks by Zapier"
Once you have a successful test from Arive, move on to the action step and set the app to “Webhooks by Zapier”. The event will be “POST”.
5.
Map the data fields from Arive to Shape
Next, you will plug in the posting URL from the Arive Marketing Source in Shape, to the URL field in the Zap that we are creating.
The Payload type will be form and then we will use the field names that we exported from Marketing Sources to map the data fields from Arive to the fields in Shape to ensure that each data point is posting in the correct location.
The data box on the lefthand side is where you will paste the field name from Shape, on the right, will be the corresponding field captured from Arive.
6.
Once done, test your Zap!
After finishing mapping the fields, scroll to the bottom of the action step to test your trigger!
You will receive a feedback response of a successful post or a failure. Any failure can be reported to support@setshape.com. Please include the full failure response and any applicable details.
Updating Shape Status Automatically from Arive
You can also have the Arive status updated the Shape status automatically with access to our open API. This is not required to receive new loans in Shape from Arive and does require a separate Zap to update the Shape status automatically! This is a two-step webhook to get the Lead ID in Shape, then update the status.
Note: Before getting started, make sure you have created an Arive Status list in Shape matching your loan statuses in Arive. You can create this status list in Settings > Manage Statuses.
Search For Records Webhook
The first step will be used to locate the matching Lead ID in Shape. This step is critical to ensure that the correct record is updated with the correct status from Arive.
1.
In Zapier, create a new Zap named "Arive Status Update > Shape"
This will be our Zap to receive status updates from Arive. At the top of the event is the “Trigger Event”, you will set this to “Arive API” where you may be prompted to sign into Arive to give permissions for the connection if you have not done so already.
2.
Set the Event dropdown to "Loan Status Updated in Arive"
This will send the new update to Shape once the Zap is finished. Once selected, move on to test the trigger.
3.
Test the trigger to pull the data fields from Arive
You will need to test the trigger to pull the data that Arive is sending. These are the data points that we will be mapping to the Shape fields.
If you do not see anything when testing the trigger, please reach out to Arive Support to troubleshoot.
4.
Set the Action Step to "Webhooks by Zapier"
Once you have a successful test from Arive, move on to the action step and set the app to “Webhooks by Zapier”. The event will be “POST”.
5.
Map the email field from Arive to Shape
Next, you will plug in the Search for Records API call URL from our API Documentation (linked here: https://setshape.com/api-search-leads), to the URL field in the Zap that we are creating.
The Payload type will be json and then we will use the Email field from Arive to map to the email field in Shape.
The data box on the lefthand side is where you will paste the field name from Shape, on the right, will be the corresponding field captured from Arive.
6.
Add your the required headers to authorize the search
The authentication token must be passed in the request header for every API request. You can find and generate your authentication token in your system settings page under “API Integrations.”
After finishing mapping the fields, scroll to the bottom of the action step to test your trigger!
You should see a successful search with the Lead ID.
Update Status Webhook
Now that we have the Lead ID from the previous webhook, we will set one final webhook to update the status accordingly!
1.
In Zapier, click to add a new step on the "Arive Status Update > Shape" Zap
Click the plus button below the step we just created to add a new step to the Zap. This step will be where we update the status of the record in Shape.
2.
Set the Event dropdown to "Webhooks by Zapier"
This will post the newest status update into Shape using the Lead ID we captured previously.
3.
Test the trigger to pull the data fields from Arive
You will need to test the trigger to pull the data that Arive is sending. These are the data points that we will be mapping to the Shape fields.
If you do not see anything when testing the trigger, please reach out to Arive Support to troubleshoot.
4.
Map the Current Loan Status from Arive and Lead ID from Shape
Next, you will plug in the Search for Records API call URL from our API Documentation (linked here:
https://setshape.com/api-update-lead-info), to the URL field in the Zap that we are creating.
The Payload type will be json and then we will use map the Current Loan Status, to the Arive Status that we created in Shape. Next, map the Lead ID we captured in the previous step to the Lead ID field in Shape.
The data box on the lefthand side is where you will paste the field name from Shape, on the right, will be the corresponding field captured from Arive.
5.
Add your the required headers to authorize the search
The authentication token must be passed in the request header for every API request. You can find and generate your authentication token in your system settings page under “API Integrations.”
After finishing mapping the fields, scroll to the bottom of the action step to test your trigger!
You should see a successful update where you can now find the record in Shape and ensure that the status updated accordingly.
Frequently asked questions
I am receiving an error when testing my Zap.
This could be due to a number of factors and any failure can be reported to support@setshape.com. Please include the full failure response and any applicable details so we can look into it for you!
Will Shape help connect Arive to Shape?
Happy to! Please reach out to support@setshape.com with the details of how we can help and we will be happy to provide you with next steps.
Can Arive update the Shape status with milestone updates?
Yes it can! This does require an additional Zap to update the Shape status and also requires access to our open API to complete.
Please reach out to support@setshape.com with the details of how we can help.
I received a new loan file in Arive but nothing is in Shape.
Please reach out to support@setshape.com with the details such as the name of the loan file, email address, phone number, etc so we can look into this!
Please also reach out to Arive support to ensure the loan file was sent to Shape successfully.