Table of Contents
Support Guide
Distribution Rules
-
Shape Software
What are Distribution Rules in Shape?
Distribution rules in Shape come into play when a record enters the system through automated marketing, API integration, or imports. These rules ensure timely and appropriate assignment to the right user.
However, distribution rules are optional. If you prefer to have records enter the system unassigned and later assign them manually or let your users claim leads from the Unassigned Record Pool, you can choose not to configure distribution rules in your system.
Start slowly. When implementing distribution rules and caps based on your business practices, it’s best to start with one or specific caps and filters. Monitor the results to ensure they align with your expectations. If adjustments are needed, make changes one at a time. This approach helps pinpoint any issues accurately, avoiding confusion from multiple simultaneous changes.
Creating Distribution Rules
Shape’s pre-configured drip campaigns save time and guarantee consistent, automated, and personalized communication with leads and customers, improving conversions and simplifying marketing efforts. They follow industry best practices, streamlining communications for an enhanced customer experience. Here’s how to get started:
1.
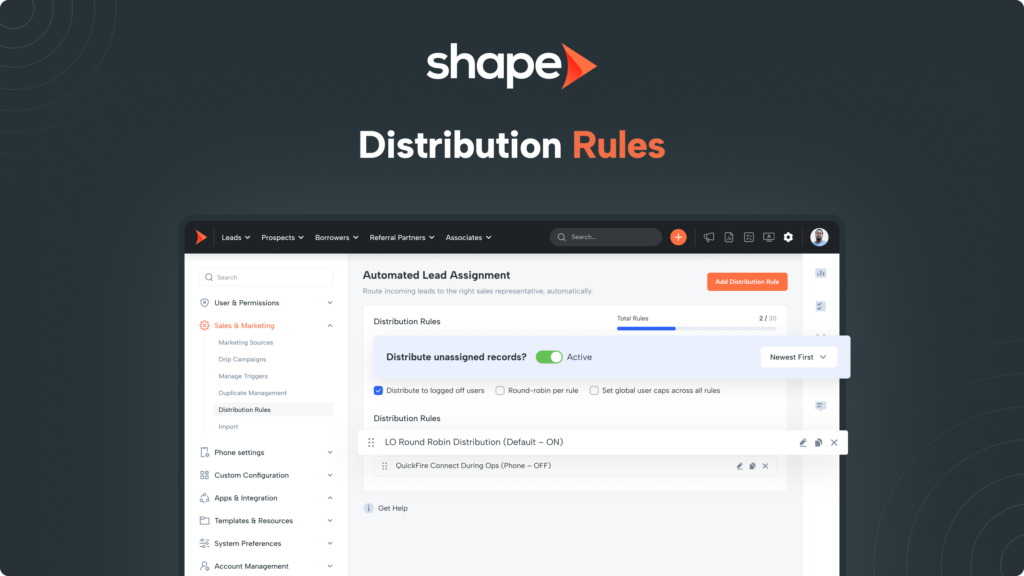
Go to Settings > Distribution Rules
To manage your distribution rules, click on the “Settings” option in the navigation bar and find “Distribution Rules” on the left hand sidebar under “Sales & Marketing”.
We’ve linked the page for you here: https://secure.setshape.com/distribution
2.
Title your distribution rule and set to ON
Title the distribution rule something recognizable if you intend to have multiple rules.
If the rule toggle is “OFF” this will not be a live distribution rule. If it is “ON” then this will be an active distribution rule. If multiple rules apply to an incoming record at the same time due to overlapping rules, the first rule that the record applies to will complete the distribution and the record will be assigned accordingly.
3.
Choose who you want this rule to distribute to
The “Distribution Recipients” is who the records that go through this distribution rule will be assigned to. You can choose between assigning it to all active users, a specific user, a team, or a department.
4.
Choose whether you want this distribution rule to apply to imports
Imports do not automatically apply drip campaigns and triggers. To ensure a seamless process, we recommend setting up a distribution rule. This rule will help assign imported files to your users and change the status to the desired one to initiate the drip campaign or triggers. To apply this distribution rule to imports, select the “Yes” option.
5.
Add redistribution rules for potentially neglected records
In those cases where leads may end up neglected by the user that receives the lead, you have the option to enable redistribution rules to send the lead directly to another user.
You will set the condition (ex: the record has not been called, opened, contacted, or is untouched!) and the time option for how long the user has before the record is redistributed. This can be in days, hours, or minutes!
Lastly, set the distribution rule you want to send the neglected lead through, then how many times you want the lead to be re-distributed!
Adding Distribution Caps
Distribution caps allow administrators to set distribution caps on users within the rule and can be set as an overall cap for all recipients on the rule or custom based on the on the individual recipient users.
1.
Customize User Caps per User
If some users are able to efficiently handle more than other users, then you can customize your user caps. Use the “Customize caps per user” check and define what those caps are on an hourly, daily, weekly, and monthly basis. Edit the user that you’d like to customize and set in the specific hourly, daily, weekly, and monthly record distribution caps for that individual.
2.
Defining Distribution Caps
It may sometimes be important that all users win the same amount of new records across this distribution rule. Adding distribution caps will prevent an imbalance of lead distribution among users and ensure that all users have the right amount of leads to work per day. If caps are met across all distribution rules, then new records will go into the “Record Pool” to be cherry picked. If all users should receive the same caps, then use the “Apply same caps to all users” check and define what those caps are on an hourly, daily, weekly, and monthly basis.
3.
When ready to enable distribution caps, simply click "Save"!
After creating the specific user’s caps, press save and you will be able to see the caps for that user. During distribution, if one user has reached their cap, it will skip that user in Push or QuickFire round-robin or will not alert that user via QuickFire first come first serve.
Setting Up Hours of Distribution
Adding hours of distribution to your rule comes into play with peak lead inquiry hours and normal hours of operation. For example, you may want to route your during-business hours leads to all available users, whereas after hours, you may have a particular team that is able to follow up on new records or you want after hours leads to come in unassigned to be cherry-picked or manually assigned by a manager or admin.
1.
Enable Hours of Distribution
Checking “Add hours of distribution” brings up the days of the week. Press the “Edit” icon to define the start and end time for each day.
2.
What happens if a lead comes in outside of my run schedule?
After enabling each day’s run schedule hours, press save to enable! If a record comes in before or after those hours, you can either set up another distribution rule for those off-times or let them come in unassigned to be manually assigned by an admin or manager.
You can easily locate unassigned records via the Unassigned Records report, linked for you here: https://secure.setshape.com/unassigned-records
Further Customizing with Filters
Add filters to route specific records to specific users. For example, if your reps are licensed or located in a particular state, route records in the same state to those users via filters.
Use filters sparingly. The filters go off of “AND” logic. Therefore, for example, if you have conditions that are filtered by “California” as the state and “Purchased” as the marketing source, then a record that is not in California and from the Purchased marketing source will not be distributed through this rule.
- Click the “Add Filters” button to add filters to the rule. Name the filter, choose the filter type and define the filter.
- After completing your filter press “Submit”!
Note: Distribution rules follow the order they appear on the settings page. Leads are processed from top to bottom, matching the criteria on each rule until they’re assigned to a user. It’s crucial to list your most restrictive rule (with filters) before a general one to ensure proper assignment. a general rule.
Distribution Method: Round Robin VS QuickFire Connect
In Shape, there are two record distribution methods: Push and QuickFire Connect. The “Pull” or “Cherry-Picking” method allows users to claim unassigned records from the “Record Pool” without a distribution rule.
With the Push method, records are auto-assigned in a round-robin manner to distribution recipients. In contrast, the QuickFire Connect method notifies recipients via popup notifications. The record is either automatically assigned to the first user who accepts the notification and calls the lead, or it is distributed in a round-robin fashion for 10 seconds to recipients until the notification is accepted.
The Round Robin Method
1.
Automatically Round Robin records to users round robin
Opting for the “Round Robin” distribution method automatically assigns records to your recipients (or recipient) in a round-robin manner.
2.
Select your distribution recipients
After choosing your distribution recipients, the “Recipient Options” dropdown will appear, allowing you to further refine and narrow down the recipient pool.
The QuickFire Connect Method
Shape’s QuickFire Connect system sends popup alerts to users, prompting them to click on a link to quickly call a lead. This ensures timely follow-ups and prevents missed opportunities. All eligible users receive on-screen popups, allowing them to accept and call out or ignore the available lead. QuickFire Connect notifications are extremely valuable for speed to lead and efficient lead distribution.
- Recipient options will pull from your QuickFire rules that you’ve created in “Manage QuickFire Connect” settings.
- Find QuickFire Settings in the "Phone Settings" section of settings.
Note: Shark Tank is another great method for distributing leads to your users. Rather than occurring automatically, users will be able to click a "Get Lead" button, or, cherry pick leads from a list of neglected records. Learn more here:
https://setshape.com/support-guides/shark-tank-in-shape-software
Frequently asked questions
Keywords: distribution rules, push, quickfire, filter, hours of distribution, run schedule, distribution caps, filters, state eligibility, cherry picking, re-distribute