Table of Contents
Support Guide
Drip Campaigns
-
Shape Software
What is Drip Campaign Automation?
A drip campaign is an automated marketing strategy where a series of pre-scheduled messages are sent to prospects or customers over time, aiming to nurture leads and guide them towards a desired action. It allows businesses to deliver personalized and targeted content at scale, fostering engagement and driving conversions.
Managing Drip Campaigns
Shape’s pre-configured drip campaigns save time and guarantee consistent, automated, and personalized communication with leads and customers, improving conversions and simplifying marketing efforts. They follow industry best practices, streamlining communications for an enhanced customer experience. Here’s how to get started:
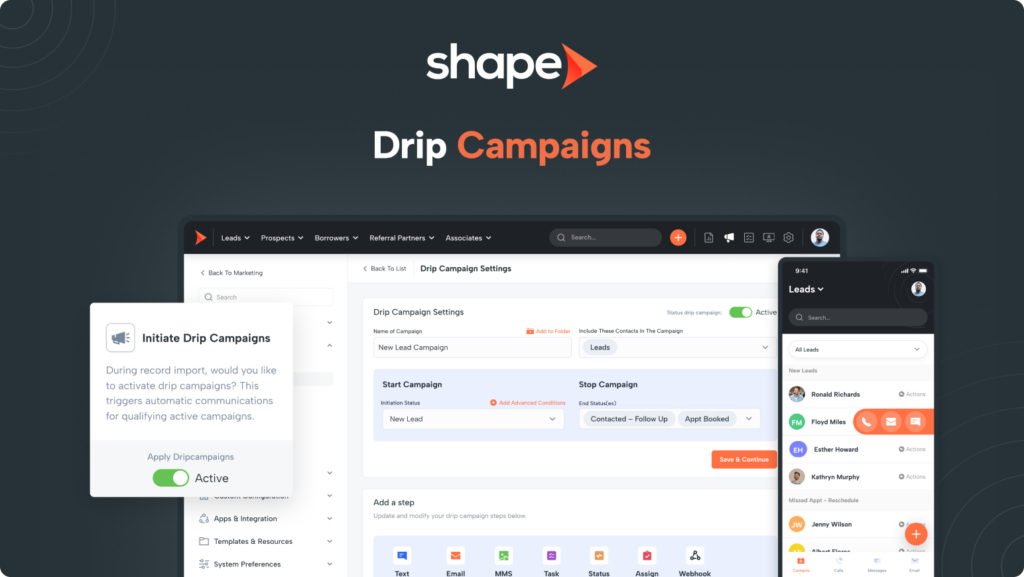
1. Go to Settings > Drip Campaigns
Access Shape’s default drip campaigns through the Drip Campaigns settings page, where you can activate them with a simple toggle switch. Easily manage campaigns by hovering over buttons for Edit, Duplicate, or Delete options, and click on titles to view settings and content for each campaign.
Quick Access Link: https://secure.setshape.com/drip-campaigns
2. Duplicate an Existing Campaign
To make it easy, you can duplicate an existing campaign to create a new campaign with a similar workflow. Click the “Duplicate” icon to the left of the campaign you wish to copy. The campaign will have the word “copy” after the title to indicate the new copied campaign to edit. Open the copied campaign to make your adjustments.
3. Create a New Campaign
To create a new custom drip campaign, click the orange “Add Drip Campaign” button at the top of the page.
First, you’ll want to name your campaign. Next, define your target audience via record types and other enrollment criteria such as Start and Stop Statues. Then, create the sequence of communications or actions that will be sent out once the initiation status (and tags if applicable) are met.
The drip campaign will run until the record reaches the “end status” that you set or until the drip campaign runs out of steps and content.
4. Organize your Campaigns with folders
Once you have created your campaigns, you can create folders using the “Add Folder” button. Use the checkmarks to select the campaigns you want to move. Once selected, choose the intended folder from the “Move to Folder” dropdown menu at the top of the page. You can also use the checkmarks to add campaigns to turn campaigns ON/OFF in bulk!
Pro Tip: You can create your email and text templates from directly within the drip campaigns settings page without ever having to leave your custom workflow!
How to Create a New Drip Campaign
1. Name your campaign and add it to a folder
Type in the name of your custom campaign and add it to a folder to further increase organization.
2. Turning your Campaign Status ON/OFF
If your campaign status is “OFF” then this campaign will be inactive and no actions that you define here will take place. Turning this to “ON” in the top right will activate the drip workflow when records reach enrollment criteria.
Pro tip: Enabling a campaign will not automatically enroll records already in the start status retroactively.
3. Select the status that will enroll records into the campaign
Shape’s Drip Campaigns are initiated by statuses and ended by statuses as well. Choose the status that initiates this campaign. There can only be one initiation status. As soon as a record hits the initiation status (with the campaign set to Active) they will be enrolled in the campaign.
4. Add the End Status(es) to halt the campaign
Shape’s Drip Campaigns can be ended by a single status or multiple statuses. Select all statuses that should stop this campaign. For example, you may not want “Welcome” and “Get in Touch” communications sent to your leads that have already been contacted, who you’ve already follow-up with, etc. Campaigns will run until an end status is reached or if the drip campaign runs out of content to send.
5. Add advanced conditions to further customize what records are enrolled.
Use advanced conditions to set additional requirements for your campaign such as:
- Add tag criteria so records that do not have a specific tag, will not be enrolled. This comes in handy if you have team members that want to use a custom campaign just for their assigned leads.
- Include or exclude records from specific sources from being enrolled.
- Determine which user's records are eligible to receive this campaign.
- Add a run schedule so communications will only go out during the hours that you set (this runs off of your company timezone)
After defining out the enrollment criteria, press “Save & Continue” to start building out the steps in the campaign.
Note: It is important to note that a record that has been previously enrolled into a campaign can be enrolled again if they are moved back into the enrollment status. A record can also be enrolled in multiple campaigns at once if you are utilizing more than one status set.
Starting the Drip Workflow
After Pressing “Save & Continue” choose the action that you want to take place from Send Email, Send Text, Send MMS Text, Change Status, and more!
1. Adding a New Step
Choose the action type, this is what is going to happen during this step, most people use drip campaigns for email and SMS communication to nurture their records through the pipeline, but also find actions such as changing the status to move your records through your pipeline automatically.
Here’s a list of the available action types:
- Text
- MMS
- Task
- Change Status
- Assign
- Webhook
- MailChimp
2. Choose Action Options
After choosing the step to add, your list of options will vary depending on the step that you choose. For example, if you select “Send Email” then you will be prompted to choose your pre-made template or build a new email right there in the popup.
Whereas if you choose to “Change Status” then simply choose the status that you want the record to change to at this point in the workflow.
3. Time Delay
Choose the time delay for when you want this step to occur. For example, send a welcome email “immediately” as soon as a new prospects enters the system as the “New” status. Another option, if the initiation status is “Nurture” then the time delay may be to send an email follow up 30 days later. Please note that the time delay from previous steps is not based on the first step, it’s based on the step that occurred right before it.
4. Time Frame
Get specific with campaign sending times for each workflow step of drip campaigns. Select the timeframes that each step should be scheduled to send for more precise marketing. These timeframes run off of the Lead's timezone to ensure that your customers are getting follow ups at optimal times. This can only be used with day delays, it will not be able to be used with “Immediately, Delay 15 Minutes, etc.”
- Once satisfied with your drip campaign initiation step, press the "Save" button to save your changes.
- Simply use the “Add Step” button to build out the next workflow step in your campaign.
- Move your steps around if needed by using the icon on the left hand side to drag and drop.
- Press the pencil “Edit” Icons to open up all steps to view your handy work
- Use the trash can icon to remove any unwanted steps.
- Review your drip campaign with all steps open. If you’re ready to activate this drip, set to Active!
Add Advanced Conditions to your Drip Campaign
Want your drip campaigns to only run on certain days and timeframes or only apply to certain users? Add run schedules to your drip campaigns that run off of your company’s timezone settings to ensure that your customers are getting follow ups during the appropriate days and times and advanced conditions to ensure that the correct records are being enrolled. To get started, click on "Add Advanced Conditions"
1. Tags
Utilize tags to determine specific recipients of this drip campaign. Note that the tags must be assigned to the records before the initiation status for the drip to begin.
2. Sources
Customize your campaign to target specific sources or exclude certain sources by defining your preferences here.
For example, you can set your campaign to Include, or, Exclude specific sources from being able to start the campaign.
3. Users
Use the dropdown to select the specific users or user groups to which this campaign applies. By default, campaigns apply to all users but can be specified to certain Users records, a team of users, or a department of users as well!
4. Run Schedule
Use the Run Schedule toggle in Advanced Conditions to specify the day and timeframe that this campaign should run.
Any communications that fall outside of the run schedule will queue to send the next time the run schedule opens.
Once ready, click Save!
Understanding Opt Out & Unsubscribe
SMS Opt Out
Shape, by default, handles standard English-language reply messages such as STOP, UNSTOP, UNSUBSCRIBE or CANCEL for Toll-Free and Long Code messages, in accordance with industry standards. Supported opt-out and opt-in keywords for Shape Messaging are listed in the dropdown below.
STOP, STOPALL, UNSUBSCRIBE, CANCEL, END, or QUIT
Any of these STOP keyword replies will prevent a customer from receiving new messages from the phone number they’re responding to. When Shape receives one of these replies, we will create a SMS Opt-Out entry and the record’s marketing status will change to “SMS Opt Out.” Once we have a blacklist entry for a particular recipient phone number, any future attempts to message them will not be sent because the customer has replied with STOP. Recipients can disable this message stop, and resume receiving messages with the START, YES, or UNSTOP commands. Please note that Toll Free numbers only respond to UNSTOP.
HELP and INFO
Either of these replies will return a message informing the customer that they can use the above commands to control the delivery of messages. It is currently not possible to customize the default response triggered by these keywords.
SMS Messaging Services
When using a Messaging Service to send SMS messages, any STOP keyword replies will apply to the entire range of phone numbers enrolled in this service. Similarly, a START keyword will disable our blacklisting, and allow messages to this recipient once more.
Email Unsubscribes
Shape can keep track of every time a recipient requests to be unsubscribed from your email. Shape automatically inserts unsubscribe links at the bottom of every email. Any recipient that clicks on the url will be automatically unsubscribed and those email addresses will be blocked from receiving future emails.
Important Notes
Text message campaigns may be subject to various legal compliance requirements depending on the nature of your text messaging campaign, the location from where you are sending your text messages, and the location of your recipients. While Shape will handle the above-described messages in the way described in this article, you should consult with your legal counsel to ensure that your text messaging campaign conforms will need to meet all applicable legal compliance requirements.
Frequently asked questions