Table of Contents
Support Guide
Encompass + Shape Software Integration
-
Shape Software
What is Encompass?
Encompass Loan Origination System (LOS) is a robust mortgage origination platform developed by Ellie Mae, a leading provider of technology solutions for the mortgage industry. Designed to streamline and automate the loan origination process, Encompass LOS empowers lenders to efficiently manage and process mortgage applications from start to finish.
Encompass LOS offers a comprehensive set of features and capabilities that support various stages of the loan origination process. Widely adopted by lenders, banks, and credit unions in the mortgage industry, it enhances operational efficiency, improves compliance, and provides a seamless end-to-end mortgage origination workflow.
Please reach out to your assigned sales or implementation manager to walk you through the process of integrating Encompass with Shape. You must have the Encompass Bankers Edition as well as the Developer Connect addendum in order to integrate.
Integration Capabilities
The integration between Encompass and Shape Software enables a seamless and efficient workflow between the two systems. Here's an enhanced overview of the integration:
1. Bi-Directional Loan Creation
With the Encompass/Shape integration, you can create loans in both platforms and have the data automatically synchronized. Whether you initiate loan creation in Shape or Encompass, the loan information will be seamlessly updated and consistent across both systems. This ensures that you always have the most up-to-date and accurate loan data.
2. User Assignment Sync
Managing user access and assignments is made easier with the integration. User assignments can be synchronized between Shape and Encompass, allowing you to manage user permissions and assignments in both systems simultaneously. This eliminates the need for manual user management and ensures that the right users have access to the relevant loan information.
3. Milestone Updates
Stay informed about the progress of your loans with milestone updates. Shape CRM can receive milestone updates from Encompass, providing you with timely information on important loan statuses. This enables you to stay on top of loan progress and take necessary actions based on the latest updates.
4. Seamless Document Transfer
Shape CRM seamlessly pushes approved loan documents to Encompass' Loan Origination System (LOS). This eliminates the need for manual document transfer and reduces the risk of errors. By automating the document push process, you can save valuable time in the loan processing workflow and ensure that all relevant documents are accurately transferred.
5. Updated 3.4 File
When updates are made in Encompass, Shape CRM can receive an updated Mismo 3.4 file. This ensures that any changes or modifications made in Encompass are accurately reflected in Shape. By maintaining data integrity and consistency across both platforms, you can trust that your loan data is always accurate and up to date.
Integration Features
By leveraging this integration, you can enhance productivity, reduce manual work, and ensure the integrity of your loan data throughout the entire loan lifecycle. Here are some more specific details pertaining to the Shape/Encompass integration:
1. Seamless Loan Creation
When a customer completes the digital 1003 application through Shape's integrated borrower point of sale, Shape automatically generates a new loan file in Encompass. You have the flexibility to customize the folder in which the newly created loan appears through the "API Integrations" settings page. The available folder options are based on the permissions granted to the Shape API User in your Encompass instance. This automation removes manual entry, and pushes a 3.4 Mismo file to facilitate seamless data transfer between systems. Alternatively, you can manually create the loan in Encompass from Shape by utilizing the "Sync to my LOS" button within the borrower's file. The loan file will be initiated in Encompass with "Shape" (or the designated name of your Shape API user) as the "File Starter". Additionally, Shape transfers the Loan Officer information to ensure the correct loan originator is assigned. This process is facilitated using the Loan Officer's Encompass user ID stored in the users' profile within Shape.
2. Synchronization of Loan Files
Shape subscribes to Encompass' "Create" webhook, enabling automatic creation of borrowers within its system and population with loan details if a loan file is first created in Encompass. In the event that Shape receives a new loan file without a matching loan GUID, it cross-references records not already linked with an Encompass loan GUID to identify potential matches within its system. Shape conducts this matching process based on email or phone number and merges the updated loan information, including User assignments, the updated MISMO file, and current milestone details. In cases where multiple records share a matching email or phone number, Shape merges the Encompass update into the oldest duplicate record in Shape.
3. Loan Updates
Shape CRM is configured to subscribe to the "Change" webhook from Encompass, ensuring real-time updates on loan milestones, including date and timestamps of completed milestones for tracking purposes. These updates are conveniently displayed in the “Tracking” tab (located within the LOS Sync sub-tab) within the contact record in Shape, granting immediate access to the latest loan information. Please note that if a large volume of updates is sent to Shape from Encompass, they enter a processing queue, which may result in a delay of up to 15 minutes before changes are reflected in Shape. For bulk updates performed in Encompass, this processing time may be extended.
4. Automatic Data Updates
Whenever a loan update is pushed to Shape, it also receives an updated 3.4 file from Encompass. This ensures that your loan data remains consistent and up to date across both platforms, saving you time and effort in manual data management.
5. Document Push to Encompass
Shape seamlessly pushes approved borrower documents to the designated document folder within Encompass. You can initiate this process by accessing the “Portal” tab in Shape, selecting the relevant documents, and clicking the “Approve” checkmark. The approved documents will then be available in the loan file within Encompass. Admins can choose which folder via the "API Integrations"
6. User Assignment Sync
To map Encompass roles to Shape roles, simply navigate to the “Manage Departments” settings page in Shape. When the Encompass User ID and roles align in both systems, user assignments are seamlessly updated within Shape, guaranteeing that the appropriate team members have access to essential loan information. If you encounter any discrepancies in user assignments within Shape, ensure that the user is placed in the correct department to correspond with their Encompass role, and verify that their user ID in their Shape user profile accurately matches Encompass.
7. Additional Fields
Shape also automatically receives additional fields beyond a 3.4 file, enriching your loan details within the CRM platform. Some notable additional fields include critical dates like appraisal dates and estimated closing dates, alongside essential information such as the loan folder, status, and additional transaction details, providing you with a comprehensive view of your loans in Shape.
Common MISMO 3.4 Fields
A Mortgage 3.4 file typically contains various fields that capture important information related to the mortgage loan. While the specific fields may vary depending on the system or platform used, here are some common fields found in a Mortgage 3.4 file:
1. Borrower Information
This includes details about the primary borrower, such as name, contact information, Social Security number, date of birth, employment history, and income.
2. Co-Borrower Information
Similar to the borrower information, this section captures details about the co-borrower if applicable.
3. Property Information
It includes data related to the property being financed, such as address, property type, estimated value, purchase price, and property tax information.
4. Loan Details
This section covers specifics about the loan, including loan amount, interest rate, loan type (e.g., fixed-rate, adjustable-rate), term, amortization schedule, and any applicable fees or charges.
5. Credit Information
This includes credit scores, credit history, outstanding debts, and any derogatory information related to the borrower’s creditworthiness.
6. Assets and Liabilities
It captures information about the borrower’s assets (e.g., bank accounts, investments, real estate) and liabilities (e.g., debts, loans, credit card balances).
7. Employment and Income
This section provides details about the borrower’s employment history, current employment status, income sources, and documentation supporting their income (e.g., pay stubs, tax returns).
8. Declarations
Borrowers are required to make certain declarations, such as confirming their intent to occupy the property as their primary residence and disclosing any legal or financial obligations.
It's important to note that the fields and their names can vary depending on the loan origination system or software. The list above gives a broad outline of common fields in a Mortgage 3.4 file. For specific field mapping guides, you can access the Encompass data dictionary in your Shape system or contact support@setshape.com for assistance.
How to Integrate Shape with Encompass Bankers Edition
The Encompass integration is a specialized and comprehensive integration that requires specific setup steps. Unlike self-serve integrations, this integration has certain requirements and processes in place to ensure optimal performance and seamless connectivity between Shape and Encompass.
It's important to understand that the API details for the Encompass integration need to be requested by Shape Software directly from Encompass. These API keys are unique to Shape and cannot be obtained independently by clients. This process ensures the security and integrity of the integration, providing a seamless and reliable connection between Shape Software and Encompass.
Within Shape, the Encompass integration involves specific setup steps, including department mapping, milestone mapping, triggers configuration, and user profile setup with Encompass IDs. Our dedicated team will handle these tasks as part of the integration process, ensuring a seamless setup experience for you.
However, it is crucial for the Encompass administrator within your organization to set up the Shape user in Encompass and grant the necessary permissions. This step is vital to ensure smooth communication between Shape and Encompass, as well as to align user access and permissions across both systems.
While we provide detailed instructions on how to perform the necessary setup tasks, it is the responsibility of the lender's Encompass administrator to complete the user setup within their Encompass instance. Please note that Shape does not have direct access to log in to your Encompass instance, so it is necessary for the Encompass administrator to perform this task.
It's worth mentioning that the Encompass user permissions setup can sometimes be time-consuming, and there may be instances where you need to open a support ticket with Ellie Mae if you have business rules or customizations that conflict with permissions. Our team is available to assist you throughout this process and provide guidance as needed.
Please note that Shape doesn't determine the template when pushing the loan file into Encompass. It's typical for your system administrator to automatically assign a template based on the "Shape" file starter role to ensure the correct loan template is applied or set business rules to look at the data supplied in the 3.4 file to assign the appropriate loan folder.
We understand the significance of proper configuration and the impact it has on your organization's workflow. Rest assured that our support team is dedicated to providing the necessary assistance and ensuring a smooth integration experience for you.
Creating the API User in Encompass for the Shape API Integration
To create an API User in your Encompass instance, please follow these key points:
This resource will provide you with step-by-step guidance on how to successfully create an API User in your Encompass instance.
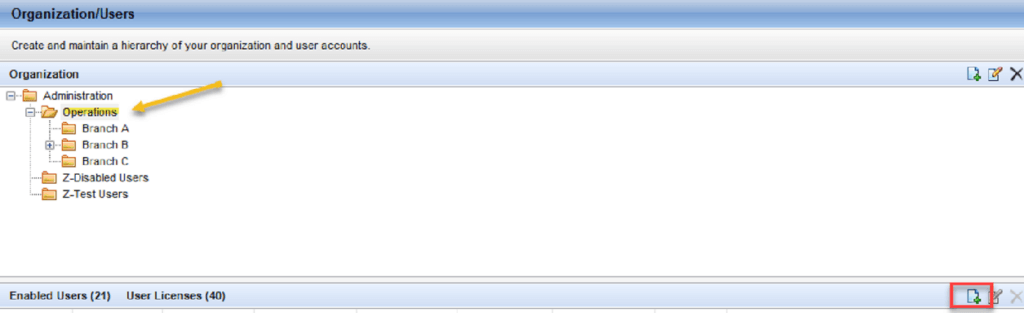
1. Select a folder to house the API User
Select a folder high enough in the organizational hierarchy that provides the appropriate access to loans for the integration. Typically, a folder just below the Administration folder or a folder for service accounts in the organizational hierarchy. After selecting the folder to house the API user, select Add User in the bottom right hand corner.
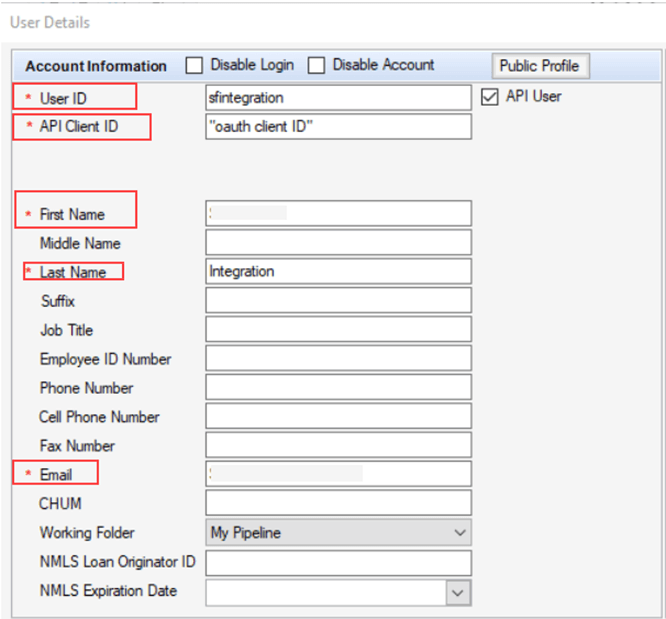
2. Enter your company's API Client ID in this field
Please note that checking “API User” on the User Details screen replaces the username and password fields with the API Client ID field.
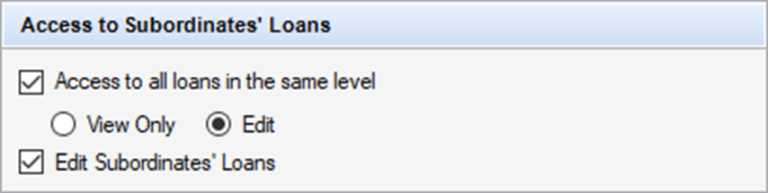
3. Review the "Access to Subordinates' Loans" settings
On the User Details screen, ensure you have the necessary loan access for your integration.
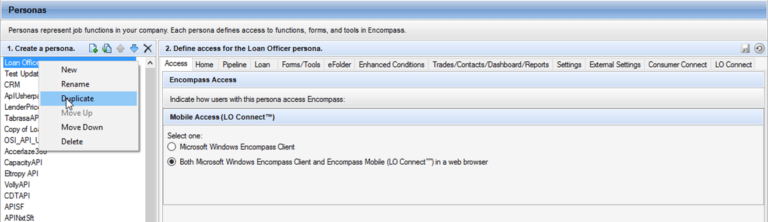
4. Assign a unique Persona to your API User
Follow the best practice of duplicating the existing Loan Officer or Loan Opener Persona in the Persona section of Encompass Settings under Company/User Setup. Rename the duplicated Persona and adjust the permissions accordingly.
Please Note: DO NOT assign this persona to a Loan Officer role. Editing permissions for Loan Officer or Loan Opener Personas later could negatively affect your integration if the same Persona is used for both Loan Officers/Loan Openers and your integration.
5. Ensure that the selected Persona has access to LO Connect
Use the radio button highlighted below to ensure that the Persona has access to LO Connect

6. Right click and Duplicate
Right click and duplicate the Persona.
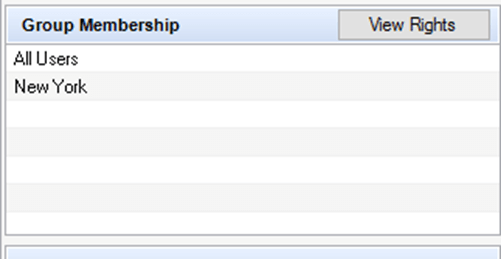
7. Assign one or more User Groups to the API User account
You may also assign one or more User Groups to the API User account to provide appropriate access to loan folders and other resources.
Troubleshooting Encompass Integration Issues
If you're experiencing unknown error messages when testing the Encompass integration for creating new loans or receiving updates, follow the steps below to troubleshoot the common issues. If the problem persists after checking these settings, you'll need to contact Encompass support and open a ticket for further assistance with your configuration.
1. Verify API User Configuration
- Ensure that the API User checkbox is selected when creating the API user. This step is crucial for enabling the API user to interact with Encompass.
- Double-check that the API Client ID is entered correctly. Remember that this field is case-sensitive, so any discrepancies in capitalization can cause issues.
- Confirm that the proper persona is added for the user. The persona dictates the user’s access and functionality within Encompass.
2. Check Persona Settings
- Access the persona settings for the API user.
- Make sure the setting “Both Microsoft Windows Encompass Client and Encompass Mobile (LO Connect) in a web browser” is selected. This ensures that the user can utilize Encompass across different platforms.
- Verify that the persona has permission to create loans. This is typically done through the “Import Loans” option within the persona settings.
- Click on the blue hyperlink associated with the “Import Loans” option and specify the file types that the persona is allowed to import. Ensuring the correct file types are selected prevents any import-related issues.
3. Check Custom Business Rules
- Keep in mind that Shape sends over a 3.4 file. Therefore, if there are any special business rules configured in your Encompass instance, this could be the factor affecting your integration.
4. Contact Encompass Support
- If you’ve followed the above steps and are still encountering problems with the Encompass integration, it’s recommended to reach out to Encompass support for further assistance. Open a tech support case and provide them with details about the issue you’re facing. Their tech support representatives will be able to help troubleshoot the problem and provide specific guidance for your configuration.
- Remember to provide Encompass support with as much information as possible, including any error messages received and steps you’ve already taken to troubleshoot the issue. This will aid them in diagnosing the problem more effectively and resolving it in a timely manner.
- By following these steps and seeking assistance from Encompass support when needed, you can ensure a smoother integration experience with Encompass and resolve any issues that may arise.
Frequently asked questions
If you try to push more information to Encompass from Shape via the “Sync to LOS” button on a loan that has already been synced, you will get an error message letting you know that the loan file has already been created.
Shape administrators can find the designated folder for pushing loans to your specific Encompass instance on the “API Integrations” page, where the destination folder will be clearly displayed.
Automated triggers sync records in Shape. If you’ve adjusted settings such as statuses, configurations might have changed or become null. Contact your system administrator or Shape Support for a diagnostic investigation on your settings.
For customized Encompass milestones or Shape statuses, adjust your triggers accordingly. You can edit or create automation linked to new milestones or statuses in Encompass or Shape through triggers found in the “Manage Triggers” settings page.
Please be aware that any updates made to the older loan file in Encompass will no longer reflect in the Shape record. Only updates made to the new loan file will update the corresponding record within Shape after recreating a new loan.
Alternatively, you can open the loan file in your Encompass instance and use the clone feature to duplicate the file. This automatically creates a new record in Shape linked to the new loan GUID, ensuring that you have complete loan details for both transactions.