Table of Contents
Support Guide
Import & Data Migration in Shape
-
Shape Software
Importing Your Contacts into Shape
You can easily import external data into Shape. By importing your contacts to Shape, you are acknowledging that your contacts have provided you consent to receive communications, and therefore have permission to market to them. Import supports data in the comma delimited text format (.csv). Follow these steps before you start importing any data.
1.
Prepare your spreadsheet of contacts
Outside of Shape, you will need to prepare your spreadsheet in a file editor (like Microsoft Excel or Google Sheets) and save it as a CSV file. Prior to importing to Shape, clean up the import file for accuracy and consistency. This involves updating the data to remove duplicates, delete unnecessary information, correct spelling and other errors, and enforce naming conventions.
2.
Formatting your file's fields for import
Certain fields, like birthday and date, must be formatted in a specific way. Make sure you’re familiar with our format guidelines below as well as our field guide on the import settings page within your system before you import your file.
3.
Assigning records on import
Ensure you include a field for who you want these records assigned to when they are imported by using the User ID for the appropriate user. User ID’s are found on the Manage Users settings page. If you do not include a column with the User ID information, then you can assign this file to a single user on the 3rd step the import.
4.
Statusing records on import
You can assign statuses to your contacts by using the proper status label in your CSV file columns with the status in the rows. Shape statuses can be found on the “Manage Statuses” settings page. Unmatched statuses will be added to the status list. You can also assign a single status to all of the records on the 3rd step of the import.
5.
Utilize our import tool to map your data to Shape
Compare your data fields with the Shape fields you can import into, and verify that your data will be mapped into the appropriate Shape fields. You might need to fine-tune the mapping before starting the import.
Note: If your import brings your total contact count above the limit of your pricing tier, you’ll experience system latency and will be subject to additional charges.
Formatting Guidelines for your CSV File
Upload a CSV file with a maximum of 3,000 records per file. When you import contacts to Shape, you’ll match each column in your import file to a field in your Shape Software system. Certain types of fields, like email address and birthday, require a specific format to import correctly, which are outlined below. Fields that are not available can be mapped to append to the notes sidebar of a record.
Formatting tips before you begin
- The field requirement settings in your system do not apply to imports.
- No fields are required when importing to Shape. Although fields are optional, they may be necessary for personalization, segmentation, or other features.
- Clearly label each column in your import file so you can easily choose the field type during the import process.
- You can arrange the columns in your file in any order.
Email Address
Only one email per email field is supported for each contact. Review this column for anything that might cause syntax errors, like missing information, unsupported characters, and extra spaces before or after an address. For example, we can only support international characters like ñ or é if they come after the @ symbol.
Text/String
Text (string) fields are alphanumeric fields limited to a maximum of 255 bytes of information and will be clipped if the limit is exceeded. In many alphabets, this is equal to 255 characters. Some alphabets or symbolic characters, like emoji, may not be supported and may use more than one byte of information per character, so it isn’t always a one-to-one ratio.
Addresses
The address fields are segmented based on address, city, state, and zip or postal code. There may be multiple address options depending on your system’s supported fields. For example mailing address, present address, subject property address, etc.
Phone Numbers
The phone fields use U.S. phone number format by default unless you have international phone number fields in your system template. For U.S. phone number formats, use the (###) ###-#### or ########## format.
Numbers or Currency
Use a number field to import numbers or currency values to your audience. We’ll add comma separators to large numbers like 1,000 or 1,000,000.
Dates
To import dates, use the month-day-year format (MM-DD-YYYY). Shape will attempt to convert the date field to match your account’s default date format, but if other formats are used, this can lead to formatting errors.
Tags
Tags help you organize and label your contacts. To import tags, create a single column in your spreadsheet labeled Tags. For each contact, add all of the tags that apply to them, separated by commas. (Example: Purchase, Zillow, Credit Repair)
Importing your CSV File
Importing contacts into Shape is a 3 step process starting with the first step: Import contacts, users, notes & tasks from any other app via CSV file with the data you need.
If you import the same file consistently, such as those that receive a CSV file of new leads daily from a lead provider, consider saving your import mapping as an import template to simplify future imports.
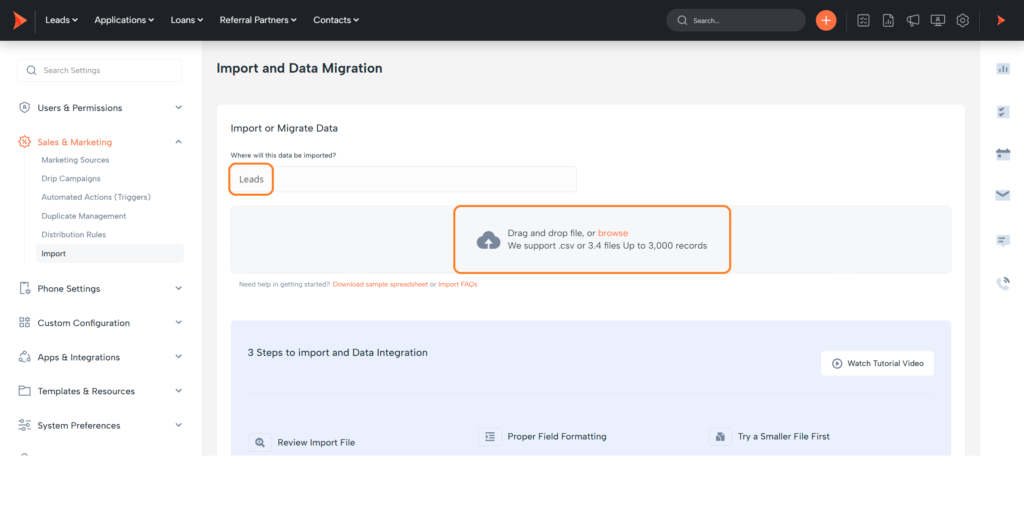
Step 1: Upload your File
Go to Settings > Import
In the top gradient navigation bar, navigate to Settings and click the Sales & Marketing Automation drop down to find the imports settings page.
Choose which record type your records will import to
Before uploading your file for import. You will want to select where the records will be imported to in Shape:
- Leads
- Prospects
- Borrowers
- Referral Partners
- Contacts
Select your Import Template (If Applicable)
If you have a previously saved Import Template you wish to use, select that from the dropdown before uploading your CSV file.
Select your prepared CSV File
This can be done either by clicking the uploads section or by clicking and dragging the file into the uploads section. Once uploaded you will automatically move on to Step 2: Mapping your Data.
Note: If you are importing for the first time, start with a small portion of your data before beginning the full import to ensure there are no errors. You can easily cancel your import if you find errors.
Step 2: Mapping your Data
After uploading your CSV file, below the upload area, a preview of your CSV file will populate. Your column names will show on the far left column, you will also have a data preview of of the first data row in your CSV file. The last column is a dropdown field to compare your data fields with the Shape fields you can import into. This column will be where you choose where to map the information to in Shape. This column shows Shape’s friendly names within the system.
Assigning Users using your import file
Ensure you include a field for who you want these records assigned to when they are imported by using the User ID for the appropriate user. User ID’s are found on the Manage Users settings page. This option is useful if you want to assign multiple users to records within one file.
Assigning statuses on import
You can assign statuses to your contacts by using the proper status label in your CSV file columns with the status in the rows. Shape statuses can be found on the “Manage Statuses” settings page and unmatched statuses will be added to the status list. This is useful if you wish to assign more than one status across your import file.
Appending to notes
If you cannot find a corresponding field in Shape to match your data, use the “Append to Notes” option. By selecting “Append to Notes,” the information from your file will save to the record and appear on the left-hand side of your contact details page. All of the friendly name dropdown list’s are defaulted to Append to Notes.
Save your mappings as an Import Template
If the file you are uploading is something that you will be importing frequently, you can save the mappings as an import template on Step 2 as well! This is especially handy for those that receive a daily CSV file of new leads from their lead providers and wish to speed up the import process.
Note: Compare your data fields with the Shape fields you can import into, and verify that your data will be mapped into the appropriate Shape fields. You might need to fine-tune the mapping before starting the import.

Step 3: Preview and Finish Import
Who will be the owner of the new records?
Ensure you include a field for who you want these records assigned to when they are imported by using the User ID for the appropriate user. User ID’s are found on the Manage Users settings page. This option is useful if you want to assign multiple users to records within one file.
What will be the status of the new records?
You can assign statuses to your contacts by using the proper status label in your CSV file columns with the status in the rows. Shape statuses can be found on the “Manage Statuses” settings page and unmatched statuses will be added to the status list. This is useful if you wish to assign more than one status across your import file.
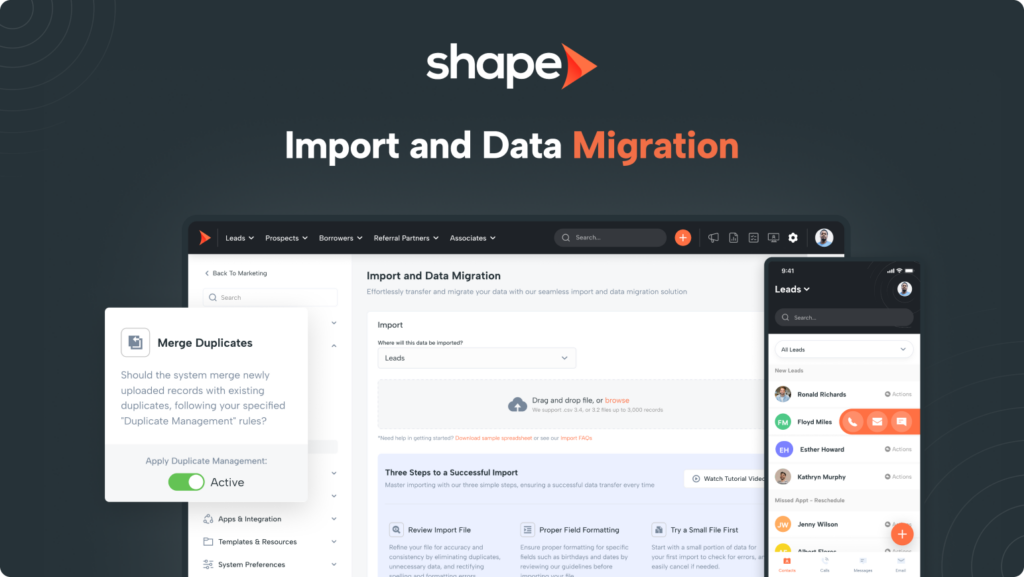
Merge Duplicates?
You can utilize this toggle to turn on duplicate management for this import and if duplicates are found, they will automatically be merged based on the duplication management settings in your system.
Initiate Drip Campaigns?
This toggle will turn on drip campaigns for the imported records. It is important to note that this will cause automatic communications to send for active drip campaigns if the initiation status is met.
Execute Actions?
This toggle will turn on automation set up in your system for the imported records. This may cause status changes, record-type conversions, and automated communications to both the user and the borrower.
Frequently asked questions
Depending on the size of your import and current traffic on the instance, the magnitude of variation in time to completion can be up to 24 hours. If you expect that there may be an underlying issue, please open up a support ticket for Shape to investigate.
Plan ahead. Since you cannot estimate how many requests are ahead of your organization, kick off the import ahead of deadlines so that you have a sufficient buffer. Choose only those objects, whose data you actually need. Reducing your import file size will definitely help in getting you to the smaller queues which would improve queue wait times.